
Seaside Tutorial
Software Architecture Group
2 - First Steps
When you decide to create an application with Seaside and Squeak, you also have to decide which versions to use. This tutorial is made for Squeak 4.2 and Seaside 3.0. Please note that Squeak and Seaside are supported by the community and the current version may be much younger than the suggested ones. That said, we do not guarantee any of the code given here to function in more recent or older versions of Seaside or Squeak.
Current Squeak images with Seaside already integrated can be downloaded, for example, from the Squeak web site http://squeak.org/Documentation/Installation/#h-5.
If you are new to Squeak and Seaside you should have a look at the Seaside All-In-One. It contains a full installation of Seaside 3.0 and is ready to use for Windows, Linux and Max OS X. Only extract the archive and run the executable of your platform.
If you use a prepared image, like the one you can download as suggested above, you do not need to install any packages at this moment. Those images should already have Seaside integrated.
Otherwise, you can install Seaside manually using its Metacello Configuration. To do this, execute (Do-It) the following code snippet in a Squeak Workspace:
As Seaside is hosted by a Web server, you need to have a server running for going on with this tutorial.
So, open the Seaside Control Panel by click on Apps→Seaside Control Panel. You should see a window as in figure 2.1.

If the control panel has no entries in your image, you need to add a server manually. Click into the upper pane and follow the Add Adaptor... entry. We recommend using the Comanche Web server, so you should click on WAComancheAdaptor. Then specify the port number on which your server should be available.
If the small star fish beside the entry is not colored orange, but instead black and white, then click on the entry to highlight it and then click on the Start button. Note the port number 8080 next to the star fish in figure 2.1. It is the port the Seaside web server is running on.
Now make sure your server is started and running, and be ready to check what you have done so far. Just open the URL http://localhost:8080/ in your local Web browser.
You should now see the Seaside Welcome page (figure 2.2).
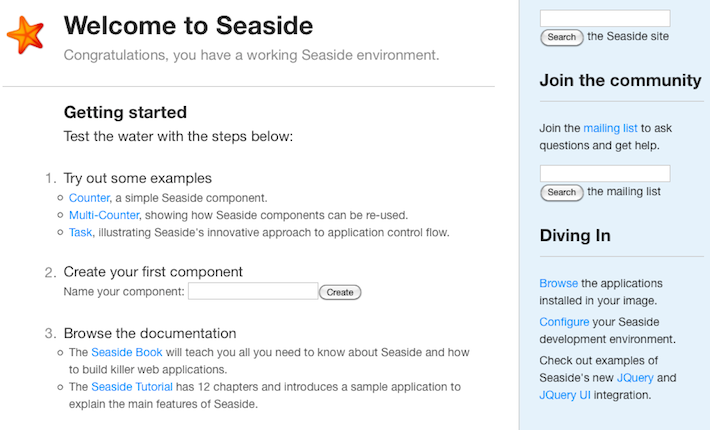
This web page gives you an overview of Seasides most prominent starting points. You may play around with these. Note well the Diving In section. We will briefly introduce the Browse facility now and the Configure facilitiy later on.
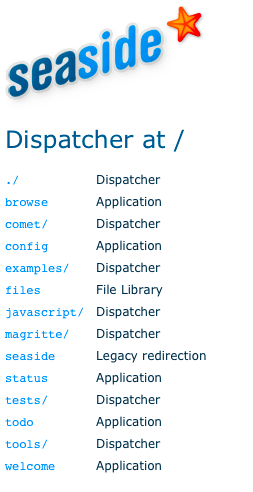
Clicking browse brings you to a page as in figure 2.3 which is called Dispachter View. This page shows all currently registered Web applications. By clicking on the name you simply open the designated Web site. Feel free to explore the tests to discover the capabilities Seaside will offer and get a feeling of what you are going to learn during the next chapters.
You should now be well prepared for making the first steps on creating Web-based applications with Seaside. Now you can try building your first component.
But first let us discover what is necessary:
WAComponent is the basic component provided by Seaside. That means every visible component inherits from WAComponent. There are many more components you can use, like WATask, but more on that later. For now, just keep WAComponent in mind.
While inheritance is one requirement, the rendering part is another. To generate HTML code from within your Smalltalk code, you need a renderer. WAComponent ensures that the method #renderContentOn: is called. By giving the method a renderer you have access to all WACanvas methods provided by Seaside. So let us keep that theoretical stuff in mind and create the first component of our ToDo Application
First you should add a new class category, STTutTodoApp.
After that we create the first class. Since we ultimately want to have a ToDo Application, we should think about a root component, a component that will be the parent for every other component. So let us say it should look like this:
Now you have a new blank class ready to serve rendered content. As mentioned before, we need the #renderContentOn: method. So just create it and give it the parameter for the renderer.
You may realize that the parameter is called html. That is our renderer. We call it html because we only render HTML content. Now you are ready for some action! Imagine you want your Web application to display its name. If so, you can implement the renderer this way:
Now you ordered the renderer to print out some text with the given string. Whilst seeing the site show the name of the application is enjoyable, you could also imagine it showing the current date as well.
To achieve this, the complete method should look like this:
Remember we want that component to be the root component, so let us also declare that. Change to the class side and add the method #canBeRoot.
The only task of the method is to return the Boolean value true. It
is needed to register your application later on.
Notice that you overwrite the existing #canBeRoot method of WAComponent that returns false by default.
Right now, you have created your first class of the ToDo Application and you surely want to see what has been done so far. Therefore, we will continue registering the application with the Seaside configuration. Open the URL: http://localhost:8080/config/.
Remember to use your defined port if it is not 8080. You should now be asked for a login. Here you use the credentials you defined when you installed Seaside manually, or you use User: admin - Password: seaside (which are default credentials).
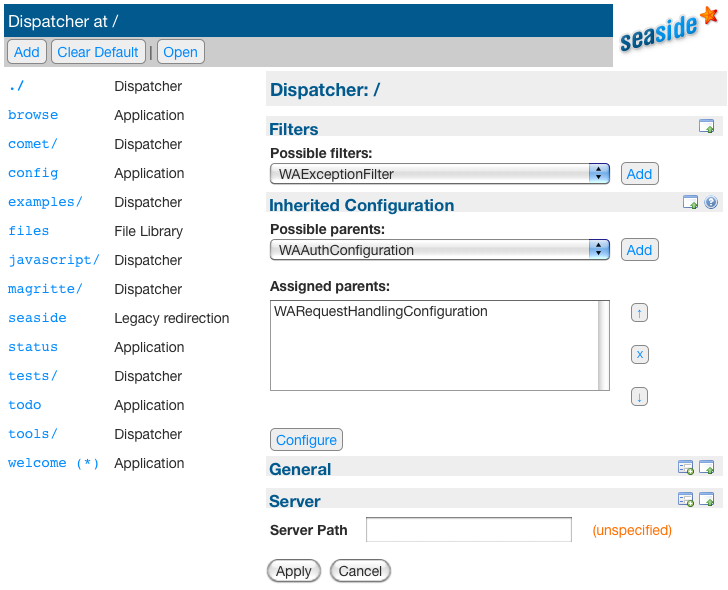
You can see an overview of all registered applications (Figure 2.4) but now, you can also change configurations or remove entries. Now, click on Add and you will see the form that allows you to add a new application (figure 2.5).

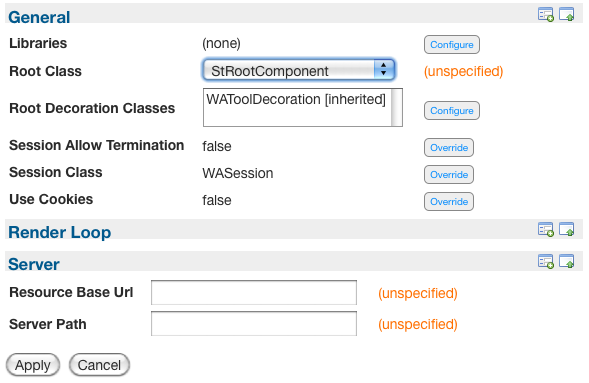
A request handler defines the URL of your application. Give it a try. Fill in the name todo and choose application as a type. Click add when you are done. You will be redirected to a new page where you can configure your newly created application. Figure 2.6 shows a part of the preferences you can set for your applications. Look at General and notice the field Root Class. Here you can see every component that returns true in the #canBeRoot method. Look at the drop down list and choose StRootComponent. Just ignore the rest of the configuration view—necessary parts will be described later on.
Congratulations! You have built your first component of your new ToDo Application. Click on Apply . Take a closer look at the list of registered applications. Your todo entry point should be there now. Just click on Open in the top menu and see the result (figure 2.7) of your rendered component. The URL should be http://localhost:8080/todo.

Maybe you did not enjoy your first application that much and were put off by the menu at the bottom of your browser window. This menu will only be available when your application is not in deployment mode and gives you some additional ways to inspect your application. Let us concentrate on the link called Halos. Just click it and see what happens.

You should immediately notice the changed view (figure 2.8). A frame, called a halo, has appeared around your component. There is a top line with some icons and the name of your component (StRootComponent). The icons are clickable. There is one for opening a class browser, one to inspect objects and a link for the CSS style editor. While we leave out the inspection halo let us have a closer look on the class browser link.

After clicking on the class browser halo you can see a class browser style window (figure 2.9). Indeed, this browser contains every available Smalltalk class and you are able to change those classes with it. Remember the importance of having your application in deployment mode when making it public.
Your Seaside component class should be automatically selected. What about changing the appearance of your application? Having the name and the date on the same line and without any whitespace looks strange. We can now change that on the fly. Click on the #renderContentOn: method in the right pane of the class browser. You should now see the method you created earlier. Just put in
between both text messages and click on accept. After clicking on the x on the right side of the top line of the class browser you can now see your application again. Notice the line break between the name and the date. In summary, the method should now look like this:

Before you can explore the halos by yourself you should point your view to the right side of the halo menu. There you can see Render / Source where the Render means rendered view and the Source stands for source view (figure 2.10). Try switching both views and notice the generated HTML source code when clicking on Source. This HTML code is generated by your renderer used in the #renderContentOn: method.
Just for your information: there is the CSS style editor where you can write pure CSS code regarding your classes and IDs. When adding a CSS command in this window, a #style method is added to your class. It only returns the CSS code as a Smalltalk string. This looks nice and simple at first, but keep in mind that this feature is deprecated. It is better to create an external CSS file and link it to the application (explained later on), especially when having big applications. Never underestimate the advantages of having the style commands in one resource over having them in thousands of classes with thousands of commands.
When talking about advantages of Seaside, you have to talk about debugging. While Seaside is integrated into Squeak or VisualWorks, it also works with the infrastructure of the images. This means that debugging with Seaside is debugging with the image-integrated debugger on the fly.
Let us test it. Just force an error and the raising of the debugger. Imagine you want to change your application to show the date of yesterday instead of today. So we could subtract 1 from the date. But now we make a little mistake: instead of subtracting, we divide the date by 1. Change the code to be similar to this:
When you now browse to the application's web page, it seems to hang and do nothing. Really? Have a look at your Squeak desktop window.
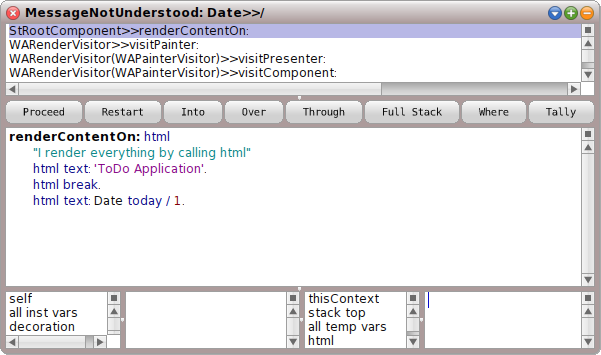
There should be a debug window (figure 2.14) waiting for your attention. As you already know how to work with Squeak, click on the entry where #renderContentOn: is sent to StRootComponent. The code causing the problem should be highlighted.
Now just remove the division and let the method look like this
Save your changes, click on Restart and then on Proceed. The debug window disappears. Switch back to your Web browser and see the page rendered correctly.
In this chapter you have learned how to create your first Seaside Web application. Congratulations, the most difficult part is done. Simple, was it not? You started with the installation of a Seaside server, worked through the creation and configuration of your first Web component and ended up using the tools you found in Seaside and Squeak. The next chapters are going to get deeper and deeper into the Web framework and build, piece by piece, the entire ToDo Application.